嵌入到现有原生应用
核心概念
如果你正准备从头开始制作一个新的应用,那么 React Native 会是个非常好的选择。但如果你只想给现有的原生应用中添加一两个视图或是业务流程,React Native 也同样不在话下。只需简单几步,你就可以给原有应用加上新的基于 React Native 的特性、画面和视图等。
把 React Native 组件集成到 iOS 集成应用中有如下几个主要步骤:
- 首先当然要了解你要集成的 React Native 组件。
- 创建一个
Podfile,在其中以subspec的形式填写所有你要集成的 React Native 的组件。 - 创建 js 文件,编写 React Native 组件的 js 代码。
- 添加一个事件处理函数,用于创建一个
RCTRootView。这个RCTRootView正是用来承载你的 React Native 组件的,而且它必须对应你在index.ios.js中使用AppRegistry注册的模块名字。 - 启动 React Native 的 Packager 服务,运行应用。
- 根据需要添加更多 React Native 的组件。
- 调试。
- 准备部署发布 (比如可以利用
react-native-xcode.sh脚本)。 - 发布应用,升职加薪,走向人生巅峰!😘
把 React Native 组件集成到 Android 应用中有如下几个主要步骤:
- 首先当然要了解你要集成的 React Native 组件。
- 在 Android 项目根目录中使用 npm 来安装
react-native,这样同时会创建一个node_modules/的目录。 - 创建 js 文件,编写 React Native 组件的 js 代码。
- 在
build.gradle文件中添加com.facebook.react:react-native:+,以及一个指向node_nodules/目录中的react-native预编译库的maven路径。 - 创建一个 React Native 专属的
Activity,在其中再创建ReactRootView。 - 启动 React Native 的 Packager 服务,运行应用。
- 根据需要添加更多 React Native 的组件。
- 在真机上运行、调试。
- 打包。
- 发布应用,升职加薪,走向人生巅峰!😘
开发环境准备
首先按照开发环境搭建教程来安装 React Native 在安卓平台上所需的一切依赖软件(比如npm)。
1. 设置项目目录结构
首先创建一个空目录用于存放 React Native 项目,然后在其中创建一个/android子目录,把你现有的 Android 项目拷贝到/android子目录中。
首先按照开发环境搭建教程来安装 React Native 在 iOS 平台上所需的一切依赖软件(比如npm)。
1. 设置项目目录结构
首先创建一个空目录用于存放 React Native 项目,然后在其中创建一个/ios子目录,把你现有的 iOS 项目拷贝到/ios子目录中。
2. 安装 JavaScript 依赖包
在项目根目录下创建一个名为package.json的空文本文件,然后填入以下内容:
{
  "name": "MyReactNativeApp",
  "version": "0.0.1",
  "private": true,
  "scripts": {
    "start": "node node_modules/react-native/local-cli/cli.js start"
  },
  "dependencies": {
    "react": "16.0.0-alpha.6",
    "react-native": "0.44.3"
  }
}
示例中的
version字段没有太大意义(除非你要把你的项目发布到 npm 仓库)。scripts中是用于启动 packager 服务的命令。dependencies中的 react 和 react-native 的版本取决于你的具体需求。一般来说我们推荐使用最新版本。你可以使用npm info react和npm info react-native来查看当前的最新版本。另外,react-native 对 react 的版本有严格要求,高于或低于某个范围都不可以。本文无法在这里列出所有 react native 和对应的 react 版本要求,只能提醒读者先尝试执行 npm install,然后注意观察安装过程中的报错信息,例如require react@某.某.某版本, but none was installed,然后根据这样的提示,执行npm i -S react@某.某.某版本。如果你使用多个第三方依赖,可能这些第三方各自要求的 react 版本有所冲突,此时应优先满足react-native所需要的react版本。其他第三方能用则用,不能用则只能考虑选择其他库。
接下来我们使用 npm(node 包管理器,Node package manager)来安装 React 和 React Native 模块。 请打开一个终端/命令提示行,进入到项目目录中(即包含有 package.json 文件的目录),然后运行下列命令来安装:
$ npm install
这些模块会被安装到项目根目录下的node_modules/目录中(所有通过 npm install 命令安装的模块都会放在这个目录中。这个目录我们原则上不复制、不移动、不修改、不上传,随用随装)。
3. 安装 CocoaPods
CocoaPods是针对 iOS 和 Mac 开发的包管理工具。我们用它来把 React Native 框架的代码下载下来并添加到你当前的项目中。 我们建议使用Homebrew来安装 CocoaPods。
$ brew install cocoapods
从技术上来讲,我们完全可以跳过 CocoaPods,但是这样一来我们就需要手工来完成很多配置项。CocoaPods 可以帮我们完成这些繁琐的工作。
把 React Native 添加到你的应用中
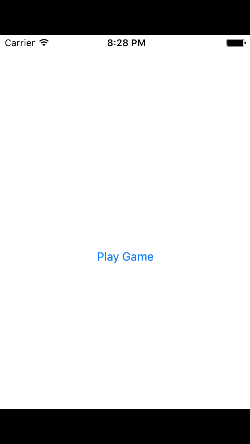
在本教程中我们用于示范的 app是一个[2048](https://en.wikipedia.org/wiki/2048_(video_game)类型的游戏。下面是这个游戏还没有集成React Native 时的主界面:
在本教程中我们用于示范的 app是一个[2048](https://en.wikipedia.org/wiki/2048_(video_game)类型的游戏。下面是这个游戏还没有集成React Native 时的主界面:
配置 CocoaPods 的依赖
React Native 框架整体是作为 node 模块安装到项目中的。下一步我们需要在 CocoaPods 的Podfile中指定我们所需要使用的组件。
在你开始把 React Native 集成到你的应用中之前,首先要决定具体整合的是 React Native 框架中的哪些部分。而这就是subspec要做的工作。在创建Podfile文件的时候,需要指定具体安装哪些 React Native 的依赖库。所指定的每一个库就称为一个subspec。
可用的subspec都列在node_modules/react-native/React.podspec中,基本都是按其功能命名的。一般来说你首先需要添加Core,这一subspec包含了必须的AppRegistry、StyleSheet、View以及其他的一些 React Native 核心库。如果你想使用 React Native 的Text库(即<Text>组件),那就需要添加RCTText的subspec。同理,Image需要加入RCTImage,等等。
我们需要在Podfile文件中指定所需的subspec。创建Podfile的最简单的方式就是在/ios子目录中使用 CocoaPods 的init命令:
$ pod init
Podfile会创建在执行命令的目录中。你需要调整其内容以满足你的集成需求。调整后的Podfile的内容看起来类似下面这样:
# target的名字一般与你的项目名字相同
target 'NumberTileGame' do

  # 'node_modules'目录一般位于根目录中
  # 但是如果你的结构不同,那你就要根据实际路径修改下面的`:path`
  pod 'React', :path => '../node_modules/react-native', :subspecs => [
    'Core',
    'DevSupport', # 如果RN版本 >= 0.43,则需要加入此行才能开启开发者菜单
    'RCTText',
    'RCTNetwork',
    'RCTWebSocket', # 这个模块是用于调试功能的
    # 在这里继续添加你所需要的模块
  ]
  # 如果你的RN版本 >= 0.42.0,则加入下面这行
  pod "Yoga", :path => "../node_modules/react-native/ReactCommon/yoga"

end
source 'https://github.com/CocoaPods/Specs.git'

# 对于Swift应用来说下面两句是必须的
platform :ios, '8.0'
use_frameworks!

# target的名字一般与你的项目名字相同
target 'swift-2048' do

  # 'node_modules'目录一般位于根目录中
  # 但是如果你的结构不同,那你就要根据实际路径修改下面的`:path`
  pod 'React', :path => '../node_modules/react-native', :subspecs => [
    'Core',
    'CxxBridge', # 如果RN版本 >= 0.47则加入此行
    'DevSupport', # 如果RN版本 >= 0.43,则需要加入此行才能开启开发者菜单
    'RCTText',
    'RCTNetwork',
    'RCTWebSocket', # 这个模块是用于调试功能的
    # 在这里继续添加你所需要的模块
  ]
  # 如果你的RN版本 >= 0.42.0,请加入下面这行
  pod "Yoga", :path => "../node_modules/react-native/ReactCommon/yoga"

end
创建好了Podfile后,就可以开始安装 React Native 的 pod 包了。
$ pod install
然后你应该可以看到类似下面的输出(译注:同样由于众所周知的网络原因,pod install 的过程在国内非常不顺利,请自行配备稳定的翻墙工具,或是尝试一些镜像源):
Analyzing dependencies
Fetching podspec for `React` from `../node_modules/react-native`
Downloading dependencies
Installing React (0.26.0)
Generating Pods project
Integrating client project
Sending stats
Pod installation complete! There are 3 dependencies from the Podfile and 1 total pod installed.
如果你看到类似"The
swift-2048 [Debug]target overrides theFRAMEWORK_SEARCH_PATHSbuild setting defined inPods/Target Support Files/Pods-swift-2048/Pods-swift-2048.debug.xcconfig. This can lead to problems with the CocoaPods installation"的警告,请查看 Xcode 的Build Settings中的Framework Search Paths选项,确保其中的Debug和Release都只包含$(inherited)。
代码集成
现在我们已经准备好了所有依赖,可以开始着手修改原生代码来把 React Native 真正集成到应用中了。在我们的 2048 示例中,首先尝试添加一个显示有"High Score"(得分排行榜)的 React Native 页面。
React Native 组件
我们首先要写的是"High Score"(得分排行榜)的 JavaScript 端的代码。
1. 创建一个index.ios.js文件
首先在项目根目录下创建一个空的index.ios.js文件。
index.ios.js是 React Native 应用在 iOS 上的入口文件。而且它是不可或缺的!它可以是个很简单的文件,简单到可以只包含一行require/import导入语句。本教程中为了简单示范,把全部的代码都写到了index.ios.js里(当然实际开发中我们并不推荐这样做)。
# 在项目根目录执行以下命令创建文件:
$ touch index.ios.js
2. 添加你自己的 React Native 代码
在index.ios.js中添加你自己的组件。这里我们只是简单的添加一个<Text>组件,然后用一个带有样式的<View>组件把它包起来。
"use strict";

import React from "react";
import { AppRegistry, StyleSheet, Text, View } from "react-native";

class RNHighScores extends React.Component {
  render() {
    var contents = this.props["scores"].map(score => (
      <Text key={score.name}>
        {score.name}:{score.value}
        {"\n"}
      </Text>
    ));
    return (
      <View style={styles.container}>
        <Text style={styles.highScoresTitle}>2048 High Scores!</Text>
        <Text style={styles.scores}>{contents}</Text>
      </View>
    );
  }
}

const styles = StyleSheet.create({
  container: {
    flex: 1,
    justifyContent: "center",
    alignItems: "center",
    backgroundColor: "#FFFFFF"
  },
  highScoresTitle: {
    fontSize: 20,
    textAlign: "center",
    margin: 10
  },
  scores: {
    textAlign: "center",
    color: "#333333",
    marginBottom: 5
  }
});

// 整体js模块的名称
AppRegistry.registerComponent("MyReactNativeApp", () => RNHighScores);
MyReactNativeApp是整体 js 模块(即你所有的 js 代码)的名称。你在 iOS 原生代码中添加 React Native 视图时会用到这个名称。
掌握核心科技: RCTRootView
现在我们已经在index.ios.js中创建了 React Native 组件,下一步就是把这个组件添加给一个新的或已有的ViewController。 The easiest path to take is to optionally create an event path to your component and then add that component to an existing ViewController.
We will tie our React Native component with a new native view in the ViewController that will actually host it called RCTRootView .
1. Create an Event Path
You can add a new link on the main game menu to go to the "High Score" React Native page.

2. 事件处理
We will now add an event handler from the menu link. A method will be added to the main ViewController of your application. This is where RCTRootView comes into play.
When you build a React Native application, you use the React Native packager to create an index.ios.bundle that will be served by the React Native server. Inside index.ios.bundle will be our MyReactNativeApp module. So, we need to point our RCTRootView to the location of the index.ios.bundle resource (via NSURL) and tie it to the module.
We will, for debugging purposes, log that the event handler was invoked. Then, we will create a string with the location of our React Native code that exists inside the index.ios.bundle. Finally, we will create the main RCTRootView. Notice how we provide MyReactNativeApp as the moduleName that we created above when writing the code for our React Native component.
首先导入RCTRootView的头文件。
#import <React/RCTRootView.h>
这里的
initialPropertiesare here for illustration purposes so we have some data for our high score screen. In our React Native component, we will usethis.propsto get access to that data.
- (IBAction)highScoreButtonPressed:(id)sender {
    NSLog(@"High Score Button Pressed");
    NSURL *jsCodeLocation = [NSURL
                             URLWithString:@"http://localhost:8081/index.ios.bundle?platform=ios"];
    RCTRootView *rootView =
      [[RCTRootView alloc] initWithBundleURL : jsCodeLocation
                           moduleName        : @"MyReactNativeApp"
                           initialProperties :
                             @{
                               @"scores" : @[
                                 @{
                                   @"name" : @"Alex",
                                   @"value": @"42"
                                  },
                                 @{
                                   @"name" : @"Joel",
                                   @"value": @"10"
                                 }
                               ]
                             }
                           launchOptions    : nil];
    UIViewController *vc = [[UIViewController alloc] init];
    vc.view = rootView;
    [self presentViewController:vc animated:YES completion:nil];
}
Note that
RCTRootView initWithURLstarts up a new JSC VM. To save resources and simplify the communication between RN views in different parts of your native app, you can have multiple views powered by React Native that are associated with a single JS runtime. To do that, instead of using[RCTRootView alloc] initWithURL, useRCTBridge initWithBundleURLto create a bridge and then useRCTRootView initWithBridge.
首先import导入React库。
import React
The
initialPropertiesare here for illustration purposes so we have some data for our high score screen. In our React Native component, we will usethis.propsto get access to that data.
@IBAction func highScoreButtonTapped(sender : UIButton) {
  NSLog("Hello")
  let jsCodeLocation = URL(string: "http://localhost:8081/index.ios.bundle?platform=ios")
  let mockData:NSDictionary = ["scores":
      [
          ["name":"Alex", "value":"42"],
          ["name":"Joel", "value":"10"]
      ]
  ]

  let rootView = RCTRootView(
      bundleURL: jsCodeLocation,
      moduleName: "MyReactNativeApp",
      initialProperties: mockData as [NSObject : AnyObject],
      launchOptions: nil
  )
  let vc = UIViewController()
  vc.view = rootView
  self.present(vc, animated: true, completion: nil)
}
注意
RCTRootView bundleURLstarts up a new JSC VM. To save resources and simplify the communication between RN views in different parts of your native app, you can have multiple views powered by React Native that are associated with a single JS runtime. To do that, instead of usingRCTRootView bundleURL, useRCTBridge initWithBundleURLto create a bridge and then useRCTRootView initWithBridge.
When moving your app to production, the
NSURLcan point to a pre-bundled file on disk via something like[[NSBundle mainBundle] URLForResource:@"main" withExtension:@"jsbundle"];. You can use thereact-native-xcode.shscript innode_modules/react-native/packager/to generate that pre-bundled file.
When moving your app to production, the
NSURLcan point to a pre-bundled file on disk via something likelet mainBundle = NSBundle(URLForResource: "main" withExtension:"jsbundle"). You can use thereact-native-xcode.shscript innode_modules/react-native/packager/to generate that pre-bundled file.
3. Wire Up
Wire up the new link in the main menu to the newly added event handler method.
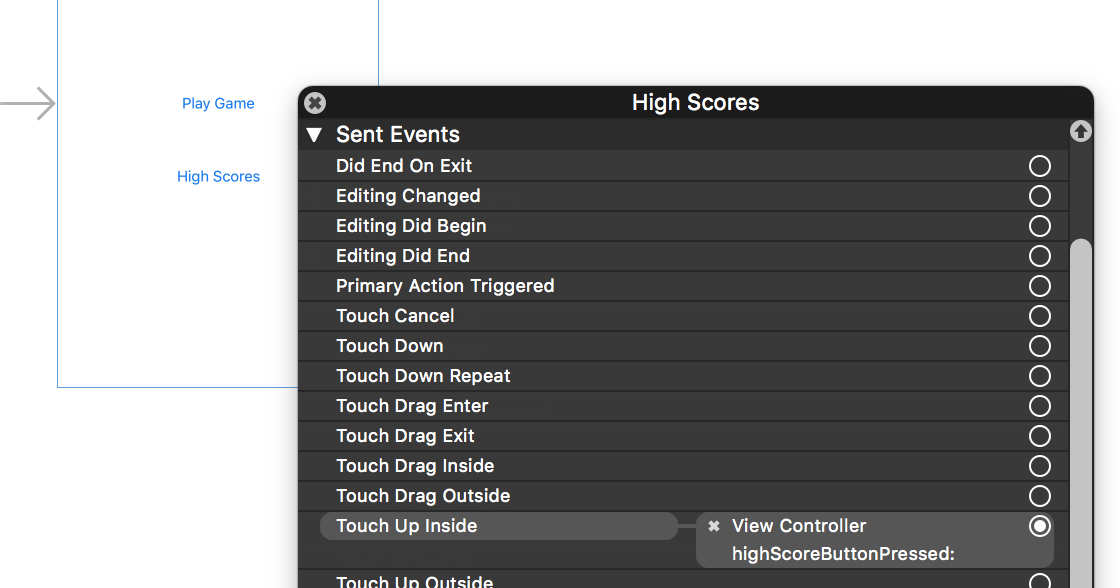
One of the easier ways to do this is to open the view in the storyboard and right click on the new link. Select something such as the
Touch Up Insideevent, drag that to the storyboard and then select the created method from the list provided.
测试集成结果
You have now done all the basic steps to integrate React Native with your current application. Now we will start the React Native packager to build the index.ios.bundle packager and the server running on localhost to serve it.
1. 添加 App Transport Security 例外
Apple has blocked implicit cleartext HTTP resource loading. So we need to add the following our project's Info.plist (or equivalent) file.
<key>NSAppTransportSecurity</key>
<dict>
    <key>NSExceptionDomains</key>
    <dict>
        <key>localhost</key>
        <dict>
            <key>NSTemporaryExceptionAllowsInsecureHTTPLoads</key>
            <true/>
        </dict>
    </dict>
</dict>
App Transport Security is good for your users. Make sure to re-enable it prior to releasing your app for production.
2. 运行 Packager
要运行应用,首先需要启动开发服务器(即 Packager,它负责实时监测 js 文件的变动并实时打包,输出给客户端运行)。具体只需简单进入到项目根目录中,然后运行:
$ npm start
Packager 只是在开发时需要,便于你快速开发迭代。在正式发布应用时,所有的 js 文件都会被打包为一整个 jsbundle 文件离线运行,此时客户端不再需要 Packager 服务。
3. 运行应用
如果你使用的是 Xcode,那么照常编译和运行应用即可。如果你没有使用 Xcode(但是你仍然必须安装 Xcode),则可以在命令行中使用以下命令来运行应用:
# 在项目的根目录中执行:
$ react-native run-ios
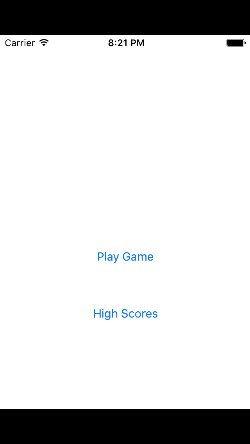
In our sample application, you should see the link to the "High Scores" and then when you click on that you will see the rendering of your React Native component.
Here is the native application home screen:
Here is the React Native high score screen:

If you are getting module resolution issues when running your application please see this GitHub issue for information and possible resolution. This comment seemed to be the latest possible resolution.
看一下完整的代码变更
你可以在这个GitHub 提交记录里查看一次完整的集成过程具体有哪些代码/文件变更。
你可以在这个GitHub 提交记录里查看一次完整的集成过程具体有哪些代码/文件变更。
把 React Native 添加到你的应用中
配置 maven
在你的 app 中 build.gradle 文件中添加 React Native 依赖:
 dependencies {
     ...
     compile "com.facebook.react:react-native:+" // From node_modules.
 }
如果想要指定特定的 React Native 版本,可以用具体的版本号替换
+,当然前提是你从 npm 里下载的是这个版本 。
在项目的 build.gradle 文件中为 React Native 添加一个 maven 依赖的入口,必须写在 "allprojects" 代码块中:
allprojects {
    repositories {
        ...
        maven {
            // All of React Native (JS, Android binaries) is installed from npm
            url "$rootDir/../node_modules/react-native/android"
        }
    }
    ...
}
确保依赖路径的正确!以免在 Android Studio 运行 Gradle 同步构建时抛出 “Failed to resolve: com.facebook.react:react-native:0.x.x" 异常。
配置权限
接着,在 AndroidManifest.xml 清单文件中声明网络权限:
<uses-permission android:name="android.permission.INTERNET" />
如果需要访问 DevSettingsActivity 界面(即开发者菜单),则还需要在 AndroidManifest.xml 中声明:
<activity android:name="com.facebook.react.devsupport.DevSettingsActivity" />
开发者菜单一般仅用于在开发时从 Packager 服务器刷新 JavaScript 代码,所以在正式发布时你可以去掉这一权限。
代码集成
Now we will actually modify the native Android application to integrate React Native.
React Native 组件
我们首先要写的是"High Score"(得分排行榜)的 JavaScript 端的代码。
1. 创建一个index.android.js文件
首先在项目根目录中创建一个空的index.android.js文件。
index.android.js是 React Native 应用在 Android 上的入口文件。而且它是不可或缺的!它可以是个很简单的文件,简单到可以只包含一行require/import导入语句。本教程中为了简单示范,把全部的代码都写到了index.android.js里(当然实际开发中我们并不推荐这样做)。
2. 添加你自己的 React Native 代码
在index.android.js中添加你自己的组件。这里我们只是简单的添加一个<Text>组件,然后用一个带有样式的<View>组件把它包起来。
"use strict";

import React from "react";
import { AppRegistry, StyleSheet, Text, View } from "react-native";

class HelloWorld extends React.Component {
  render() {
    return (
      <View style={styles.container}>
        <Text style={styles.hello}>Hello, World</Text>
      </View>
    );
  }
}
var styles = StyleSheet.create({
  container: {
    flex: 1,
    justifyContent: "center"
  },
  hello: {
    fontSize: 20,
    textAlign: "center",
    margin: 10
  }
});

AppRegistry.registerComponent("MyReactNativeApp", () => HelloWorld);
3. 配置权限以便开发中的红屏错误能正确显示
如果你的应用会运行在 Android 6.0(API level 23)或更高版本,请确保你在开发版本中有打开悬浮窗(overlay)权限。If your app is targeting the Android API level 23 or greater, make sure you have the overlay permission enabled for the development build. You can check it with Settings.canDrawOverlays(this);. This is required in dev builds because react native development errors must be displayed above all the other windows. Due to the new permissions system introduced in the API level 23, the user needs to approve it. This can be acheived by adding the following code to the Activity file in the onCreate() method. OVERLAY_PERMISSION_REQ_CODE is a field of the class which would be responsible for passing the result back to the Activity.
if (Build.VERSION.SDK_INT >= Build.VERSION_CODES.M) {
    if (!Settings.canDrawOverlays(this)) {
        Intent intent = new Intent(Settings.ACTION_MANAGE_OVERLAY_PERMISSION,
                                   Uri.parse("package:" + getPackageName()));
        startActivityForResult(intent, OVERLAY_PERMISSION_REQ_CODE);
    }
}
Finally, the onActivityResult() method (as shown in the code below) has to be overridden to handle the permission Accepted or Denied cases for consistent UX.
@Override
protected void onActivityResult(int requestCode, int resultCode, Intent data) {
    if (requestCode == OVERLAY_PERMISSION_REQ_CODE) {
        if (Build.VERSION.SDK_INT >= Build.VERSION_CODES.M) {
            if (!Settings.canDrawOverlays(this)) {
                // SYSTEM_ALERT_WINDOW permission not granted...
            }
        }
    }
}
掌握核心科技:ReactRootView
我们还需要添加一些原生代码来启动 React Native 的运行时环境并让它开始渲染。首先需要在一个Activity中创建一个ReactRootView对象,然后在这个对象之中启动 React Native 应用,并将它设为界面的主视图。
如果你想在安卓 5.0 以下的系统上运行,请用
com.android.support:appcompat包中的AppCompatActivity代替Activity。
public class MyReactActivity extends Activity implements DefaultHardwareBackBtnHandler {
    private ReactRootView mReactRootView;
    private ReactInstanceManager mReactInstanceManager;

    @Override
    protected void onCreate(Bundle savedInstanceState) {
        super.onCreate(savedInstanceState);

        mReactRootView = new ReactRootView(this);
        mReactInstanceManager = ReactInstanceManager.builder()
                .setApplication(getApplication())
                .setBundleAssetName("index.android.bundle")
                .setJSMainModuleName("index.android")
                .addPackage(new MainReactPackage())
                .setUseDeveloperSupport(BuildConfig.DEBUG)
                .setInitialLifecycleState(LifecycleState.RESUMED)
                .build();

        // 注意这里的MyReactNativeApp必须对应“index.android.js”中的
        // “AppRegistry.registerComponent()”的第一个参数
        mReactRootView.startReactApplication(mReactInstanceManager, "MyReactNativeApp", null);

        setContentView(mReactRootView);
    }

    @Override
    public void invokeDefaultOnBackPressed() {
        super.onBackPressed();
    }
}
如果你使用的是 Android Studio , 可以使用Alt + Enter快捷键来自动为 MyReactActivity 类补上缺失的 import 语句。注意BuildConfig应该是在你自己的包中自动生成,无需额外引入。千万不要从com.facebook...的包中引入!
我们需要把 MyReactActivity 的主题设定为 Theme.AppCompat.Light.NoActionBar ,因为里面有许多组件都使用了这一主题。
<activity
  android:name=".MyReactActivity"
  android:label="@string/app_name"
  android:theme="@style/Theme.AppCompat.Light.NoActionBar">
</activity>
一个
ReactInstanceManager可以在多个 activities 或 fragments 间共享。 You will want to make your ownReactFragmentorReactActivityand have a singleton holder that holds aReactInstanceManager. When you need theReactInstanceManager(e.g., to hook up theReactInstanceManagerto the lifecycle of those Activities or Fragments) use the one provided by the singleton.
下一步我们需要把一些 activity 的生命周期回调传递给ReactInstanceManager:
@Override
protected void onPause() {
    super.onPause();

    if (mReactInstanceManager != null) {
        mReactInstanceManager.onHostPause(this);
    }
}

@Override
protected void onResume() {
    super.onResume();

    if (mReactInstanceManager != null) {
        mReactInstanceManager.onHostResume(this, this);
    }
}

@Override
protected void onDestroy() {
    super.onDestroy();

    if (mReactInstanceManager != null) {
        mReactInstanceManager.onHostDestroy();
    }
}
我们还需要把后退按钮事件传递给 React Native:
@Override
 public void onBackPressed() {
    if (mReactInstanceManager != null) {
        mReactInstanceManager.onBackPressed();
    } else {
        super.onBackPressed();
    }
}
This allows JavaScript to control what happens when the user presses the hardware back button (e.g. to implement navigation). When JavaScript doesn't handle a back press, your invokeDefaultOnBackPressed method will be called. By default this simply finishes your Activity.
Finally, we need to hook up the dev menu. By default, this is activated by (rage) shaking the device, but this is not very useful in emulators. So we make it show when you press the hardware menu button (use Ctrl + M if you're using Android Studio emulator):
@Override
public boolean onKeyUp(int keyCode, KeyEvent event) {
    if (keyCode == KeyEvent.KEYCODE_MENU && mReactInstanceManager != null) {
        mReactInstanceManager.showDevOptionsDialog();
        return true;
    }
    return super.onKeyUp(keyCode, event);
}
现在 activity 已就绪,可以运行一些 JavaScript 代码了。
测试集成结果
You have now done all the basic steps to integrate React Native with your current application. Now we will start the React Native packager to build the index.android.bundle package and the server running on localhost to serve it.
1. 运行 Packager
运行应用首先需要启动开发服务器(Packager)。你只需在项目根目录中执行以下命令即可:
$ npm start
2. 运行你的应用
保持 packager 的窗口运行不要关闭,然后像往常一样编译运行你的 Android 应用(在命令行中执行./gradlew installDebug或是在 Android Studio 中编译运行)。
如果你是使用 Android Studio 来编译运行,有可能会导致 packager 报错退出。这种情况下你需要安装watchman。但是 watchman 目前没有稳定的 Windows 版本,所以在 Windows 下这种崩溃情况暂时没有特别好的解决方案。
编译执行一切顺利进行之后,在进入到 MyReactActivity 时应该就能立刻从 packager 中读取 JavaScript 代码并执行和显示:

在 Android Studio 中打包
你也可以使用 Android Studio 来打 release 包!其步骤基本和原生应用一样,只是在每次编译打包之前需要先执行 js 文件的打包(即生成离线的 jsbundle 文件)。具体的 js 打包命令如下:
$ react-native bundle --platform android --dev false --entry-file index.android.js --bundle-output android/com/your-company-name/app-package-name/src/main/assets/index.android.bundle --assets-dest android/com/your-company-name/app-package-name/src/main/res/
注意把上述命令中的路径替换为你实际项目的路径。如果 assets 目录不存在,则需要提前自己创建一个。
然后在 Android Studio 中正常生成 release 版本即可!
然后呢?
然后就可以开发啦~可是我完全不会 React Native 怎么办?
我们建议你先通读本站的所有文档,看看博客,看看论坛。如果觉得知识太零散,不够系统,那么你也可以考虑下购买我们的入门课程(链接里有目录,目录里有一些免费试听内容)。